A Tellermine (Plate Mine) static model for Call
of Duty
Milkshape 3D and file conversion sections by No1_sonuk
The first part of this tutorial covers modelling the mine itself in Milkshape
3D (MS3D).
If you use any other program, skip to the file preparation stage.
The second part (after the Milkshape export) is common to all models.
Note that this tutorial is currently for STATIC models only, not animated.
It also does not currently cover Level Of Detail (LOD) models. These
are used to view the models from a distance - The high-poly model is replaced
by a lower-poly version when you are far away enough to not notice.
LOD models were omitted to get this tutorial out quick.
Files you will need:
Latest version of Milkshape 3D (1.7.0 at time of writing) http://www.milkshape3d.com
ScorpioMidget's CoD exporter plugins for MS3D, placed in MS3D's root directory.(V2.0b
at time of writing) http://www.scorpiomidget.com
In MS3D:-
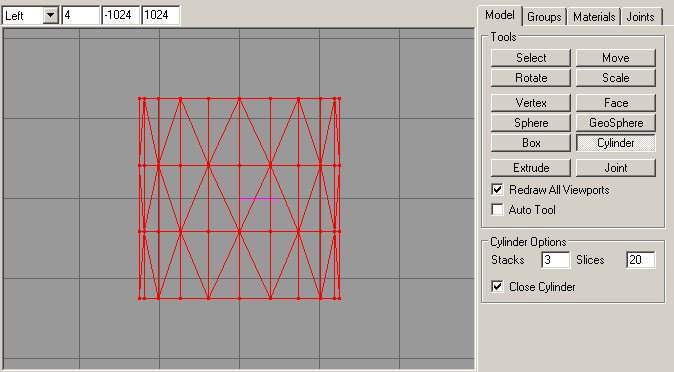
1) Using the cylinder primitive from the Model tab, create a 3-stack, 20
sided cylinder, 50 units diameter and 50 units high in the left/right view
window (-25 to +25 in both cases). We'll scale it down to the proper size
and shape later. (Fig. 1)
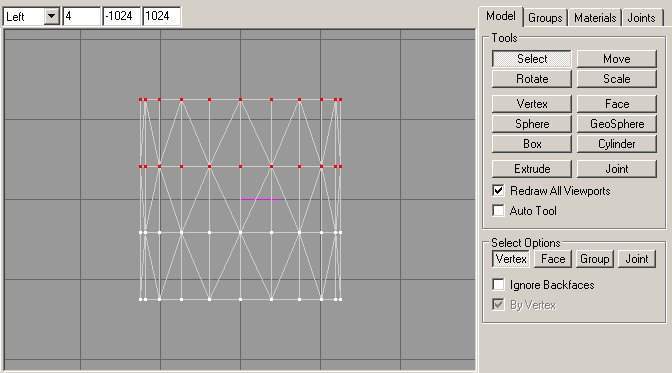
2) Select the top 2 vertex rings. (Fig. 2)
3) Scale them in by a factor of 0.4 in the x and z axes (leave y as 1). (Fig.
3)

4) Create a new directory and save your model. I'll use "wmdteller43"
for the directory, and "wmdteller43_01.ms3d" for the model file. "wmd"
because it was originally made for a mod called WMD, "teller43" because it
is a Tellermine 43, and the "_01" is the version number of the model.
Add 1 to the number each time you save so that you can recover an earlier
version if you completely mess up.
5) Now select the top FACES of the mine and regroup them.
6) Rename the group to "trigger".
7) Select the bottom Faces and regroup them with the name of "base"
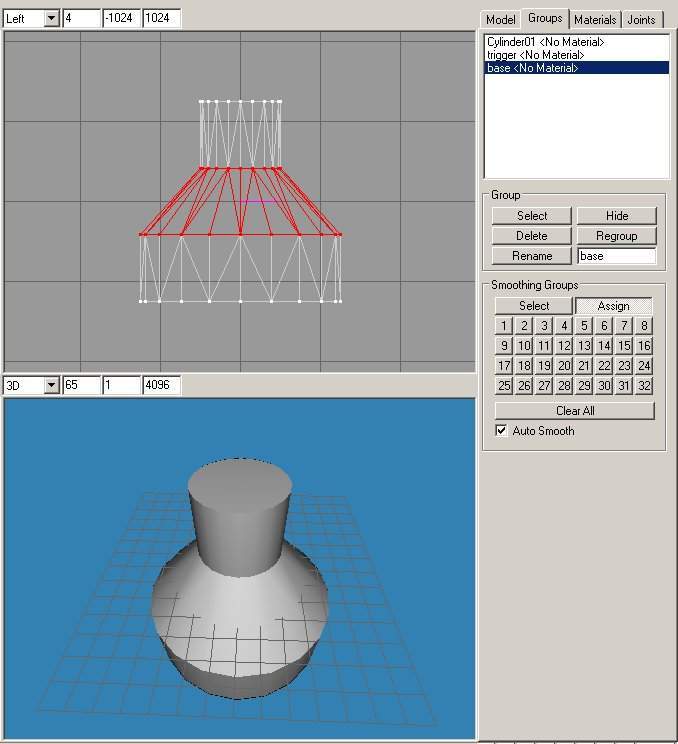
8) Select the middle stack of faces (the cone part) and assign them to smoothing
group 2. This makes "hard" edges at the top and botom of this section.
Note: If you use Unwrap3D to skin your model you will need to redo all of
the smoothing groups (This option will not be covered in this tutorial).
(fig. 4)
9) Save your model. I'll use "wmdteller43_02.ms3d".
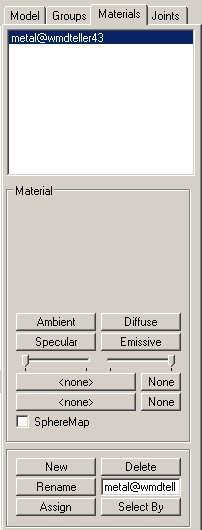
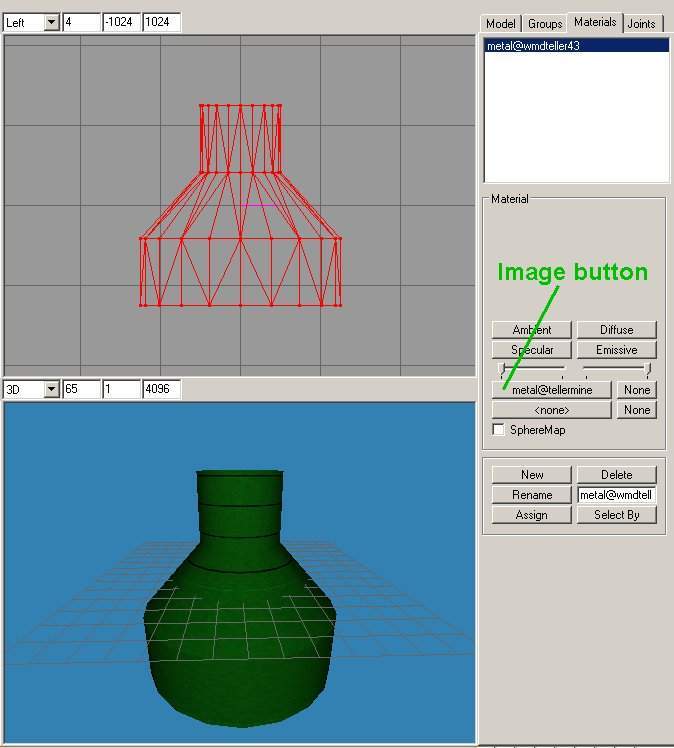
10) In the Materials tab, create a new material, and name it "metal@wmdteller43".
The "metal@" part tells CoD to use the metal shadertype. (fig. 5)
11) In the 3D window, right click, then select "textured". Because
no texture is assigned yet, the image shouldn't change (unless you were on
"flatshade" beforehand).
12) From the Groups tab, select each of the 3 groups, then go back to the
Materials tab, select the "metal@wmdteller43" material and press "Assign".
As you've not given the material an actual image yet, the 3D view will be
unchanged.
13) Go back to the Groups tab and make sure they were all assigned.
If they're not, repeat step 12. (fig. 6)

14) Save your model. I'll use "wmdteller43_03.ms3d".
Skinning the model
NOTE: There are other, better, ways to texture this model, but they involve
additional software such as Unwrap3D.
15) Now, either make your own skin image or use this one. My skin is made
so that any number of slices can be used for the mine model. On this model,
we would probably be better off using a 256 x 256 skin, but the bigger one
is easier for beginners to work with.
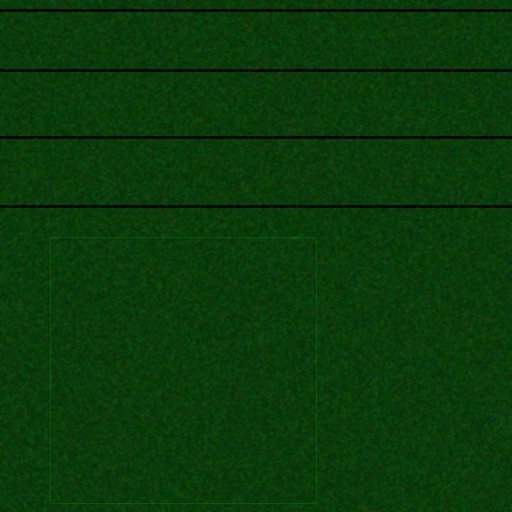
16) Call it "[email protected]" and put it in the directory with the
model files.
17) Go to the Materials tab and select the "metal@wmdteller43" material.
18) Press the image button indicated in Fig. 7, below, (button label is "none"
when no image is assigned).
19) Find and select the image file you just created/downloaded, then press
"OK".
20) The 3D image will now change. (fig. 7)
It's very unlikely that it will be useable like that, so we need to use the
Texture Coordinate Editor (TCE).
21) Go to the Groups tab and select all the groups. (You need to do
it by groups, rather than selecting the faces).
22) Open the TCE from the "Window" menu, and expand it so that you can see
all of the image. (fig. 8)
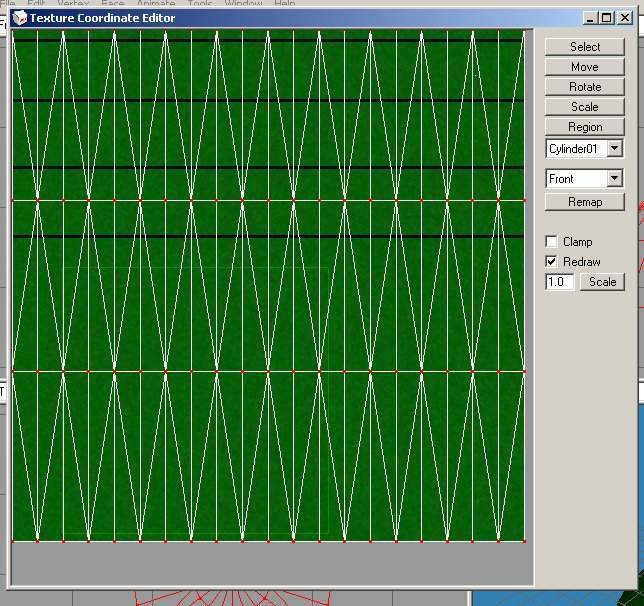
23) Put a tick in the "Redraw" checkbox. This allows the 3D view to
update continuously while you are modifying the skin.
24) If the previous steps worked right, you should see the unwrapped Cylinder01
group.
25) It's likely that the lines don't line up with the vertices, so press
"Select" and select the first line you need to move.
26) Press "Move", then drag the vertices up or down to line them up with
the texture.
27) Repeat 25 and 26 until all the vertex lines are lined up. (fig. 9)
28) Close the TCE and save the model. I'll use "wmdteller43_03_t.ms3d".
Same version of model, but now textured ( the "_t" ).
29) Open the TCE again. The close-save-open will save you much hair-pulling
in the long run because you are bound to mess it up at some stage.
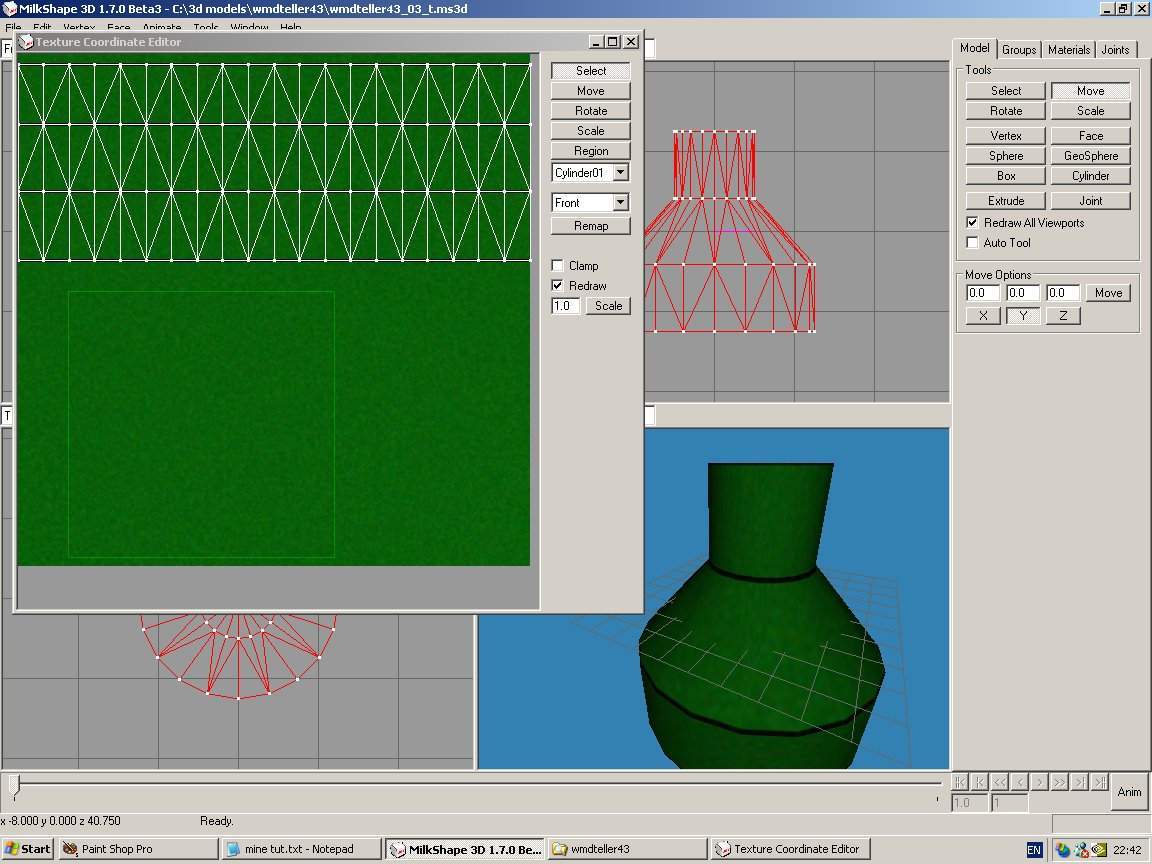
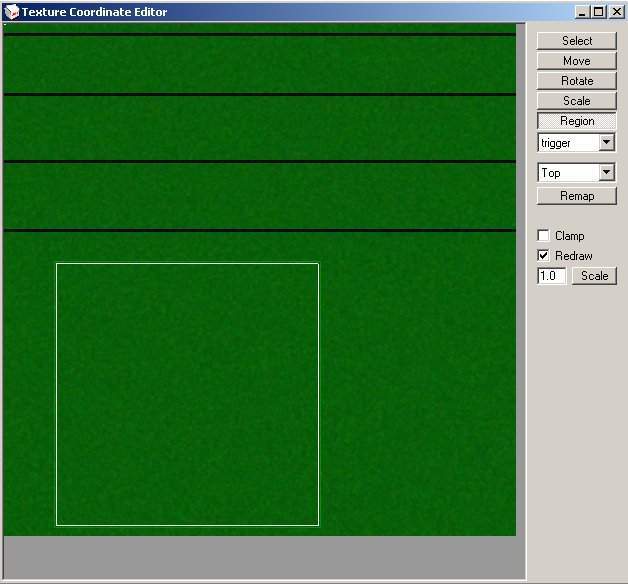
30) Put a tick in the "Redraw" checkbox, and Press the "Region" button.
31) From the dropdown boxes, select "trigger" and "top".
32) Using the left mouse button, drag a box just inside the light coloured
box, as shown. (fig. 10)
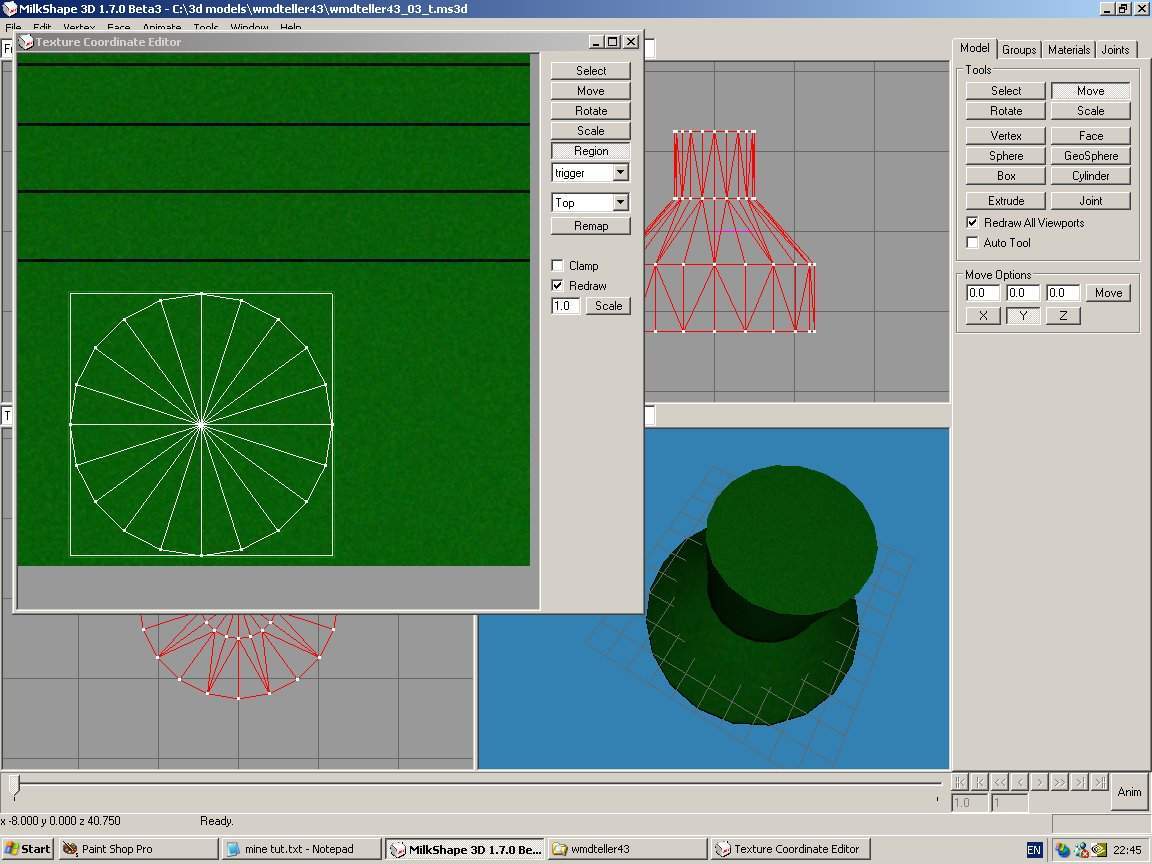
33) Click "Remap", and the texture will change in the 3D view (move the TCE
if you need to), and a top view of the vertices will appear in the TCE. (fig.
11)
34) Repeat 32 and 33 until you're happy with the result.
35) Close the TCE and save the model. I'll use "wmdteller43_04_t.ms3d".
36) Repeat 29 thru 33 with "base" and "bottom" at step 31. If you do
this immediately after the trigger, you may not need to do step 32 as the
area may already be selected.
37) Close the TCE and save the model. I'll use "wmdteller43_05_t.ms3d".
38) You should now have a textured, but out of proportion, model of a Tellermine
43 in your 3D window. (fig. 12)

Getting the proportions right -
Rescaling the model
As it is, it's far too high compared to its diameter. This was done
to make it easier to skin in MS3D.
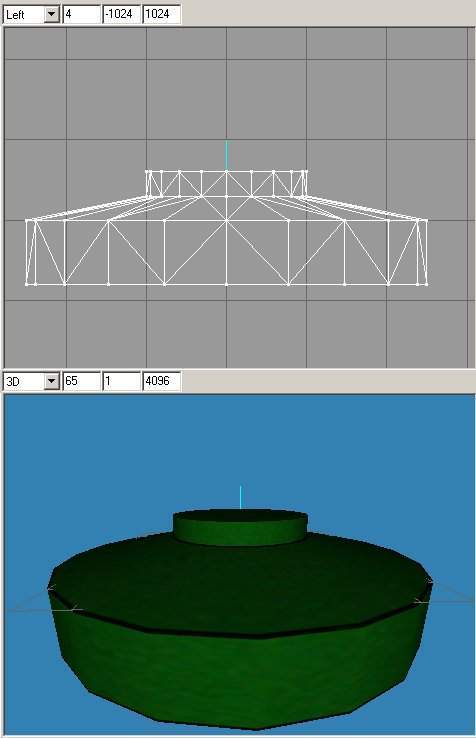
39) Select only the second from the bottom ring of vertices and move them
to y= -0. ( Should be y + 8.333)
40) Select only the bottom ring of vertices and move them to y= -8. ( Should
be y + 17)
41) Select only the second from the top ring of vertices and move them to
y= 3. ( Should be y - 5.333)
42) Select only the top ring of vertices and move them to y= 6. ( Should
be y - 19)
The mine should now be in the right proportions. (fig. 13)
43) Save the model. I'll use "wmdteller43_06_t.ms3d".
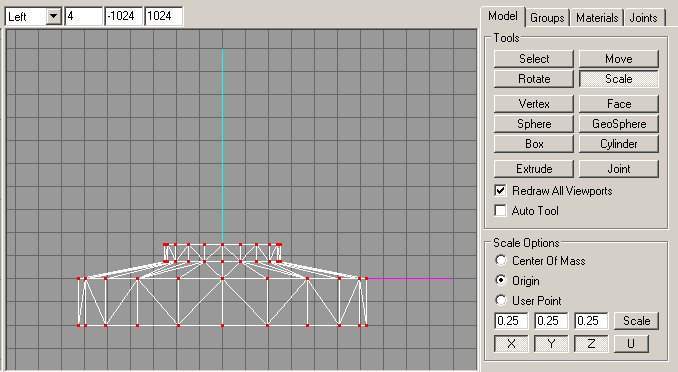
44) Now the model may be in the right proportions, but it's 4 times too big.
Select the whole model, then scale by 0.25 in x, y, and z axes, centred on
the origin. (fig. 14)
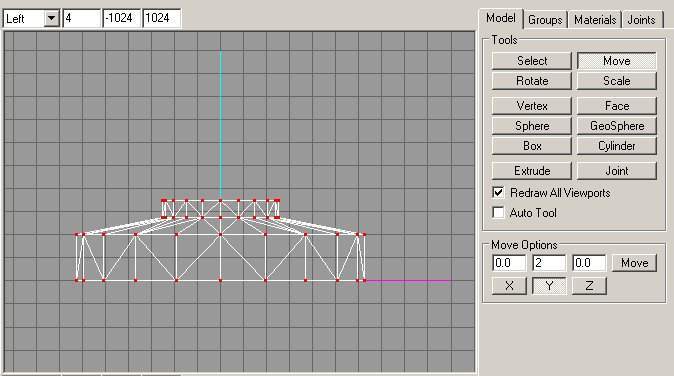
45) While the model is still selected, move it so that the bottom of the
mine is at y= 0 (depending on what you want it for, you may want the top
at y= 0, or even leave it in the middle). In my case, I move it y +
2 to make the bottom at y = 0. (fig. 15)
46) Save the model. I'll use "wmdteller43_07_t.ms3d".
Exporting to the Call of Duty xmodel_export
intermediate format
The following assumes that you installed Call of Duty and the tools in the
default directories.
Steps marked with *) are Milkshape-specific.
47) Create a directory in "tools\model_export" for your model. Call it "wmdteller43".
(Note 1)
48*) Due to the way Milkshape assigns its axes, you'll probably need to rotate
your model 90 degrees around the x axis, using the origin as the pivot.
You could fix the orientation in Radiant using the "angles" keypair, but
it solves a lot of problems doing it in Milkshape.
49*) In Milkshape, Select FILE > EXPORT > CoD X*_export.
50*) If you didn't put any bones into your model, you will be asked if you
wish one to be auto-inserted, click "Yes".
51*) A joint will appear in your model, and you will be given a save dialogue
box.
52) Save the "wmdteller43.xmodel_export" file into the "tools\model_export\wmdteller43"
directory.
55) Place the skin images in the "tools\model_export\wmdteller43" directory.
56) Place a shader (Note 2) in the "tools\model_export\wmdteller43" directory.
57) Open the Asset Manager. (Note 3)
58) From the list on the left, select "Xmodel", then press "New item".
59) Enter the name "wmdteller43" and press OK.
60) Now in "model type", select "rigid".
61) To the right of the "filename" box, press the button with 3 dots to search
for you model.
62) Search for and select the "wmdteller43.xmodel_export" file from the "tools\model_export\wmdteller43"
directory. Then OK the file box.
63) Go to File > Save as, and save the file as "wmdteller43.gdt" in the
"tools\model_export" directory.
64) From the "tools\bin" directory, run "converter.exe". Make a note
if any errors come up.
65) If no errors come up, go to the "tools\game\main" directory.
66) Copy all the "xblah" directories and the "skins" directory to your "Call
of Duty\main" directory. (Note 4)
67) Open your map in CoD Radiant. (Note 5)
68) Place a misc_model in your map. Don't worry if it doesn't show
up, there's a SNAFU in radiant that puts the wrong path to the model in the
"model" key pair.
69) Select only the box that appeared when you inserted your model (if it's
not already) and press "n".
70) Click on the "model" key pair, and edit the value to "xmodel\wmdteller43".
Press enter.
71) Your model should now be there. Tadaa! (Note 6)
Notes
1) Creating the subdirectories below the tools\blah_export directories isn't
necessary, but it does mean your models will have proper names, rather than
just numbers.
2) Here's where I'm a little in the dark. The model needs a shader to compile,
but I think that if you use the existing shadertypes (metal@... etc) you
may not need it.
3) I kept getting errors when I used the start bar link, so I use Windows
Explorer and double-click on the asset manager in the "tools\bin" directory.
4) Doing this will make them accessible to CoDRadiant. You should PAK them
with your map before distributing. In the directories you just copied there
will be some files you don't need. You should copy them into temporary directories
somewhere, then delete the spare files before putting them into the "Main"
directory.
5) You might want to create a bare room map to test models in.
6) I had a weird problem where my models would sometimes not show up if only
one was present. Someone else who used the model from this tutorial
had no trouble. YMMV.